思考清楚背包的代码设计,这部分还是比较复杂的!
先把流程看懂,然后在想为什么要这么设计
【设计问题】Item & ItemData 为什么需要这两个类呢?为什么一个解决不了问题呢?
Item
新建
item.gd脚本,继承Resource父类,设置类名class_name Item。定义通用基础属性导出变量:
export var icon: Texture2D:道具图标。export var item_name: String:道具显示名称。export_multiline var description: String:多行文本描述。export var price: int:售价参数。
ItemData子类脚本编写
新建
item_data.gd脚本,继承Item父类,设置类名class_name ItemData。定义枚举
enum Type { FOOD, POTION, SCROLL, EQUIPMENT }区分道具分类。新增导出变量:
export var type: Type:绑定枚举类型。export var is_consumable: bool:标记是否可消耗。export var max_stack: int:堆叠上限,默认设为64。
资源配置实例
创建第一个道具资源
item_hp_small_2.tres,代表小型回血药水。
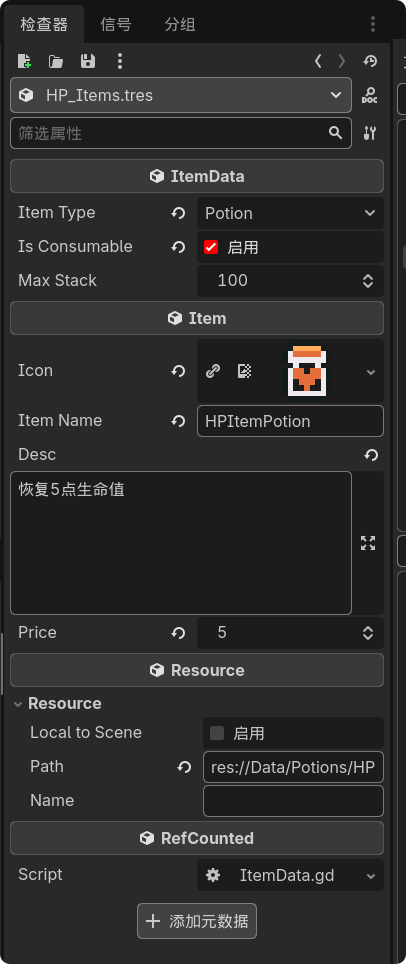
配置属性:分类设为
POTION,标记为可消耗,堆叠上限64,设置图标贴图、名称“小型回血药水”、描述及售价5金币。
难道是后面可能扩展了 更丰富的元素?我感觉教程这里怪怪的
SlotData Recouce 背包中放置每一个 ItemData 的格子的Class
核心是存储一定数量的ItemData ,所以里面定义了一个ItemData 放置的物品Item 和 quantity 数量
ps:
func _init() -> void就是class的构造函数,当对象实例创建的时候执行SlotData.new(ItemData,10),可以自定义属性参数做初始化
extends Resource

@export var item_data: ItemData;

@export var quantity: int;

func _init(_item:ItemData, _quantity: int) -> void:
	item_data = _item
	quantity = _quantity
InventorySlot 背包格子场景
然后来到背包 Inventory Pannel 的场景 里面每个背包格子又是 Inventory Slot 这个是之前创建好的
UI界面 - 背包场景UI ( Inventory Pannel )- 背包格子场景( Inventory Slot)
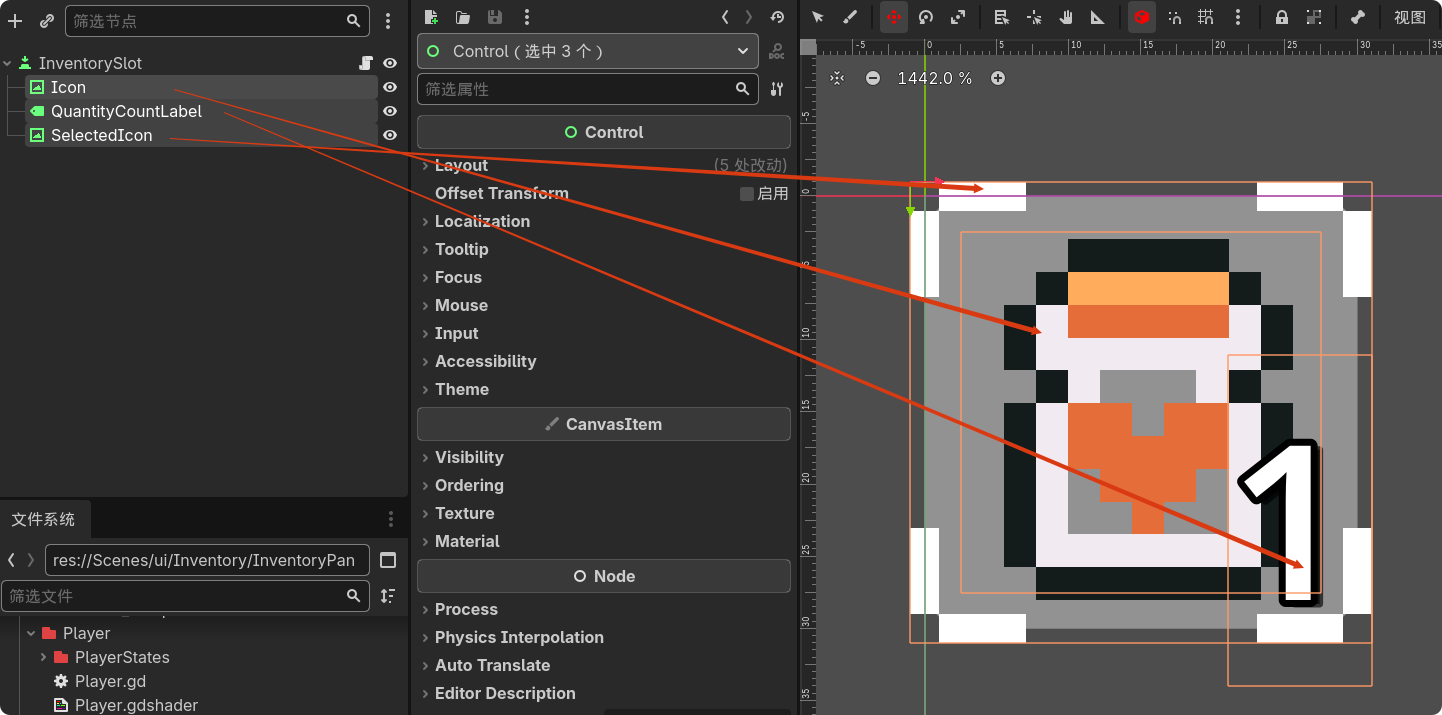
Inventory Slot 的 UI构成
Icon 是展示放置到物品格子的精灵图素材 【icon和button基类的命名冲突, 改为InventoryIcon】
QuantityCountLabel 是展示物品数量
SelectedIcon是当前格子是否被选中
前两个属性,我是从ItemData中动态读取的
extends Button
class_name InventorySlot;


## slot_index 被点击的格子索引值, button 1 / 0 鼠标左右键,不同的点击方式功能不一样
signal on_slot_clicked(slot_index: int,button: int)

## 格子鼠标悬浮过触发
signal on_slot_hovered(slot_index: int)

@onready var inventory_icon: TextureRect = %InventoryIcon
@onready var quantity_count_label: Label = $QuantityCountLabel
@onready var selected_icon: TextureRect = $SelectedIcon

## slot_index 这个slot_index 会在背包动态根据格子的位置动态更新, -1 为初始值且是无效值,这个格子不给去执行交互
var slot_index: int  = -1

## 当前格子会承载的物品数据
var slot_data: SlotData;

# load_slot 绑定当前格子的物品信息,这个目前在哪里执行还不知道,应该是触发更新才执行
# pannel 中当背包数据全局变化,循环所有的背包格子节点执行更新调用的
func load_slot(_slot_data: SlotData):
	slot_data = _slot_data
	if slot_data and slot_data.item_data:
		## 更新icon
		inventory_icon.texture = slot_data.item_data.Icon
		inventory_icon.show() # 坑clear_slot() 会隐藏图标,但 load_slot() 在重新放入物品时没有把图标显示回来。
		## 如果load的数量大于1才展示格子的数量label,否则不展示那个数量下标
		if slot_data.quantity > 1:
			quantity_count_label.text =  str(slot_data.quantity)
			quantity_count_label.show()
		else:
			quantity_count_label.hide()
	else:
		clear_slot()

## clear_slot 清理格子
func clear_slot() -> void:
	slot_data = null
	inventory_icon.texture = null
	inventory_icon.hide()
	quantity_count_label.hide()


func _on_pressed() -> void:
	on_slot_clicked.emit(slot_index) # Replace with function body.


func _on_mouse_entered() -> void:
	on_slot_hovered.emit(slot_index) # Replace with function body.
这里就是背包每一个格子的的基础代码逻辑了:
每个格子承载的SlotData
将来在背包Pannel会被动态渲染的Index 索引
以及将来装在SlotData的一些显示逻辑和清空逻辑
DropItem 等待被捡起的道具 【Area2d】
核心是:等待被捡起的 一定数量的 ItemData + 一些其他的东西
extends Area2D

@export var amount: int = 1;
@export var item_data: ItemData;.

# 这个拿的是 item_data.Icon
@onready var drop_icon: Sprite2D = $DropIcon

func _ready() -> void:
	if item_data and item_data.Icon:
		drop_icon.texture = item_data.Icon


func load_item(slot_data:SlotData) -> void:
	if slot_data and slot_data.item_data.Icon:
		drop_icon.texture = slot_data.item_data.Icon
		amount = slot_data.quantity
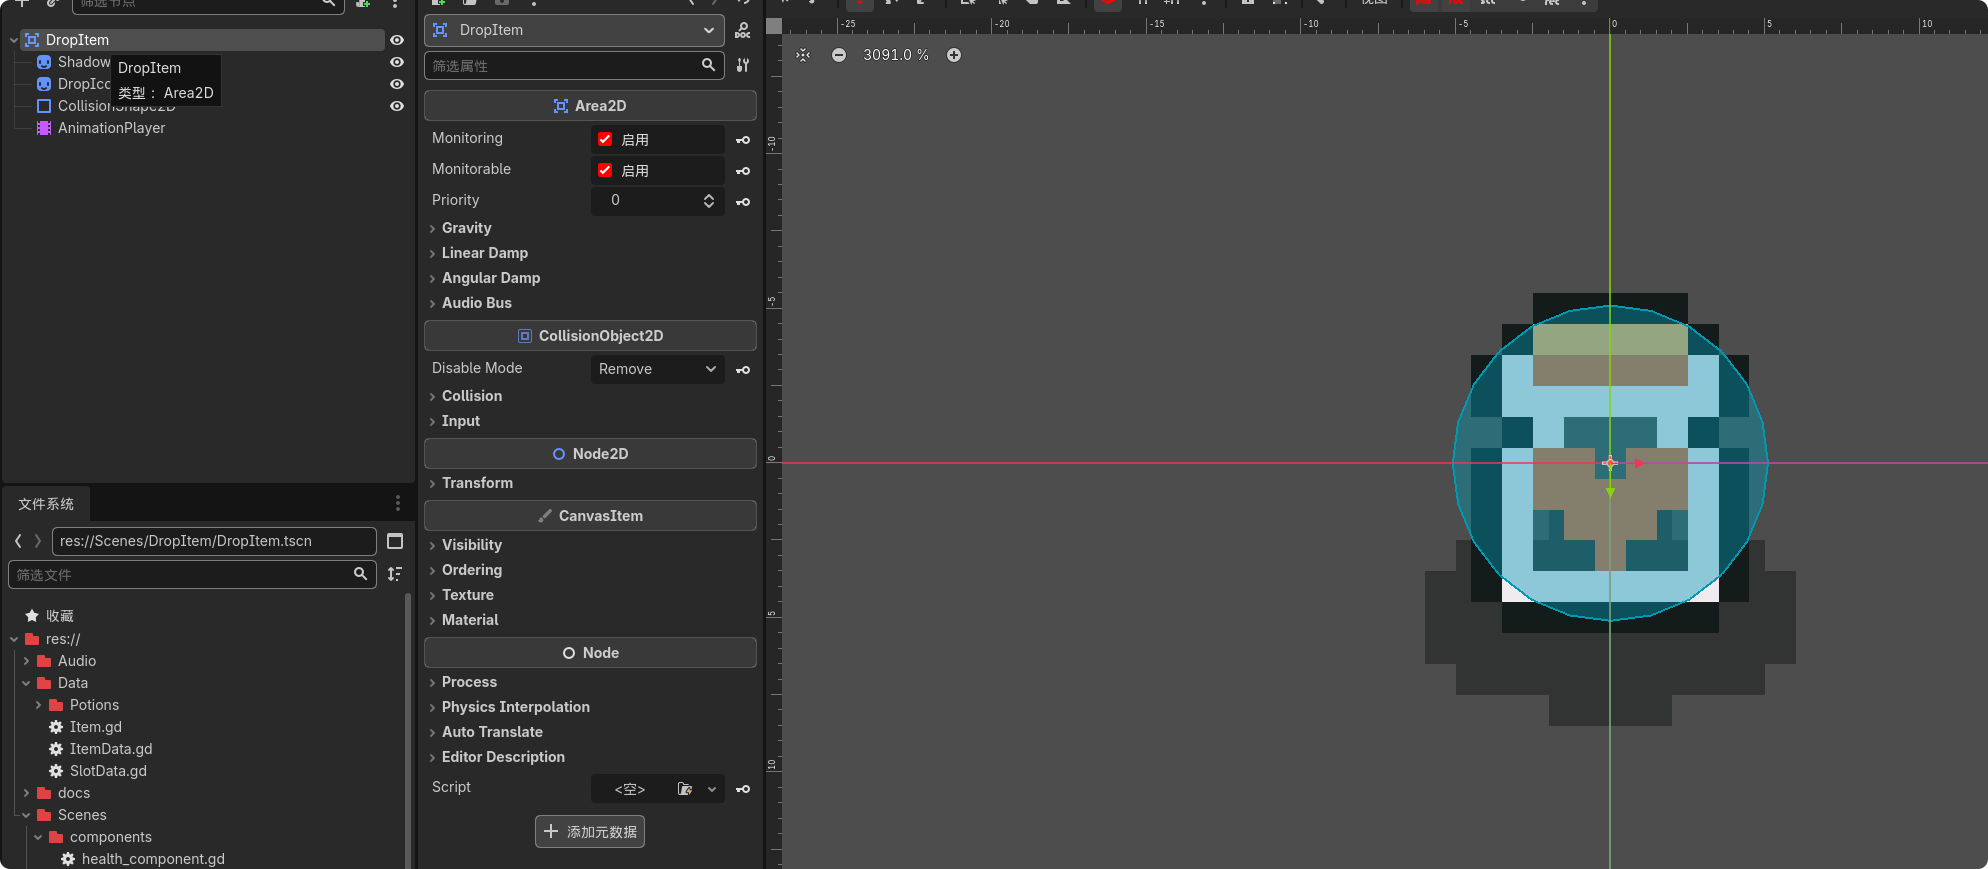
Shadow Sprite2d 物品阴影
DropIcon Sprite2d 物品贴图
CollisionShape2D 碰撞体
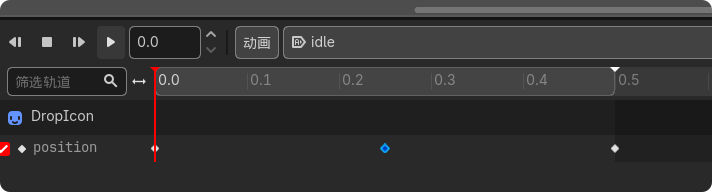
AnimationPlayer 动画播放节点,添加物品贴图的 position 完成上下浮动的物品效果
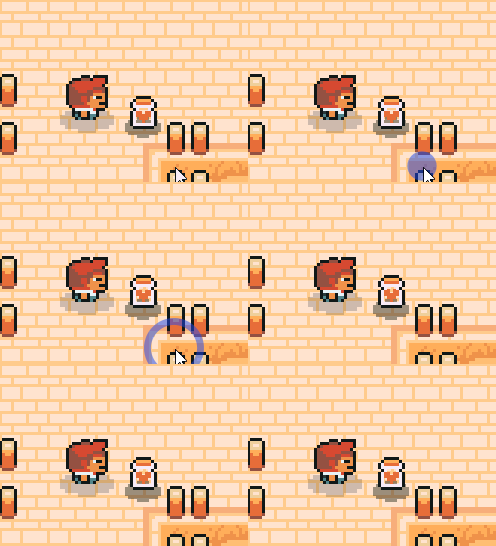
还要加发光shader着色器,一个shine 的闪光效果
给 DropIcon Sprite2d 添加材质
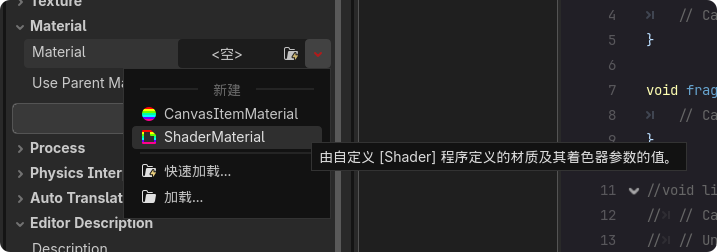
然后创建着色器脚本,现在还不会搞着色器,可以去下面这个网站找一些喜欢的shader来玩这里用的这个 https://godotshaders.com/shader/simple-2d-highlight/ 去网站上直接把着色器代码复制一下
shader_type canvas_item;
render_mode blend_premul_alpha;

// ───────── Visual controls ─────────
uniform float Angle_deg : hint_range(-90.0, 90.0) = 30.0;   // base band angle (degrees)
uniform float Brightness : hint_range(0.0, 5.0) = 2.5;      // white intensity added over sprite

// Feather (softness). Set to 0.0 for hard edges.
uniform float Band_Soft  : hint_range(0.0, 0.3) = 0.06;

// ───────── Staging controls ─────────
// 1, 2, or 3 sweeps per cycle
uniform int   Stage_Count : hint_range(1, 3) = 2;

// Per-stage durations (seconds). Only the first N are used (N = Stage_Count).
uniform float Stage1_Duration : hint_range(0.01, 10.0) = 1.0;
uniform float Stage2_Duration : hint_range(0.01, 10.0) = 1.5;
uniform float Stage3_Duration : hint_range(0.01, 10.0) = 1.0;

// Per-stage band widths (UV units). Only the first N are used.
uniform float Stage1_Width : hint_range(0.0, 0.5) = 0.12;
uniform float Stage2_Width : hint_range(0.0, 0.5) = 0.12;
uniform float Stage3_Width : hint_range(0.0, 0.5) = 0.12;

// Per-stage direction toggles (true = left→right; false = right→left)
uniform bool Stage1_LeftToRight = true;
uniform bool Stage2_LeftToRight = false; // default opposite for variation
uniform bool Stage3_LeftToRight = true;

// ───────── Animation mode ─────────
// Loop → continuous; One_Shot → plays full cycle once (optional delay) then stays off.
uniform bool  One_Shot = false;
uniform float OneShot_Delay : hint_range(0.0, 10.0) = 0.0;

// Loop phase offset (0..1 across the entire multi-stage cycle)
uniform float Phase_Offset : hint_range(0.0, 1.0) = 0.0;

// ───────── NEW: Angle wiggle during sweep ─────────
// Enable to vary angle by ±Wiggle_Amount_deg over the stage progress.
uniform bool  Wiggle_Angle = false;
uniform float Wiggle_Amount_deg : hint_range(0.0, 45.0) = 15.0;

// ───────── NEW: Pause between shines (seconds) ─────────
uniform float Shine_Pause : hint_range(0.0, 10.0) = 0.4;

// Rotate UVs around center
vec2 rotate_uv(vec2 uv, vec2 center, float deg){
    float a = radians(deg);
    mat2 r = mat2(vec2(cos(a), -sin(a)), vec2(sin(a), cos(a)));
    return r * (uv - center) + center;
}

void fragment() {
    // 1) Base sprite color
    vec4 base = texture(TEXTURE, UV);

    // 2) Stage durations actually used
    int N = clamp(Stage_Count, 1, 3);
    float T1 = max(1e-4, Stage1_Duration);
    float T2 = (N >= 2) ? max(1e-4, Stage2_Duration) : 0.0;
    float T3 = (N >= 3) ? max(1e-4, Stage3_Duration) : 0.0;

    // Number of pauses per cycle:
    // - Loop: pause after each stage (including last→first)
    // - One_Shot: pause only between stages (no pause after last)
    float P = max(0.0, Shine_Pause);
    float pause_count = One_Shot ? float(N - 1) : float(N);

    // 3) Total cycle duration includes pauses
    float Ttotal = T1 + T2 + T3 + P * pause_count;
    Ttotal = max(Ttotal, 1e-4); // safety

    // 4) Determine time position in the cycle (loop vs one-shot)
    float t01;
    if (One_Shot) {
        float t = max(0.0, TIME - OneShot_Delay);
        t01 = clamp(t / Ttotal, 0.0, 1.0);
    } else {
        t01 = fract(Phase_Offset + TIME / Ttotal);
    }
    float tsec = t01 * Ttotal;

    // If one-shot finished → output base only
    bool finished_one_shot = (One_Shot && t01 >= 1.0);

    // 5) Build timeline with pauses interleaved
    // Timeline order:
    // S1(T1) → P(P) → [S2(T2) → P(P)] → [S3(T3) → P(P or none if One_Shot)]
    float t = tsec;

    // Boundaries
    float s1_start = 0.0;
    float s1_end   = s1_start + T1;
    float p1_end   = s1_end + ((P > 0.0) ? P : 0.0);

    float s2_start = (N >= 2) ? p1_end : 0.0;
    float s2_end   = (N >= 2) ? (s2_start + T2) : 0.0;
    float p2_end   = (N >= 2) ? (s2_end + ((P > 0.0) ? P : 0.0)) : 0.0;

    float s3_start = (N >= 3) ? p2_end : 0.0;
    float s3_end   = (N >= 3) ? (s3_start + T3) : 0.0;
    // Pause after stage 3:
    //  - Loop: include pause 3
    //  - One_Shot: no pause after last stage
    float p3_end   = (N >= 3)
        ? (s3_end + (((!One_Shot) && (P > 0.0)) ? P : 0.0))
        : 0.0;

    // 6) Decide if we're in a stage segment or a pause segment
    int stage = 0;        // 0 = pause, 1/2/3 = in that stage
    float t_local = 0.0;  // time since current stage began
    float T_stage = 1.0;  // current stage duration

    if (t >= s1_start && t < s1_end) {
        stage = 1; T_stage = T1; t_local = t - s1_start;
    } else if (N >= 2 && t >= s2_start && t < s2_end) {
        stage = 2; T_stage = T2; t_local = t - s2_start;
    } else if (N >= 3 && t >= s3_start && t < s3_end) {
        stage = 3; T_stage = T3; t_local = t - s3_start;
    } else {
        stage = 0; // in a pause window
    }

    // If one-shot finished OR we're in a pause: show base only (premultiplied)
    if (finished_one_shot || stage == 0) {
        vec3 out_rgb0 = base.rgb * base.a; // premultiply
        COLOR = vec4(out_rgb0, base.a);

    }

    // 7) Normalized progress within the current stage (0..1)
    float p = clamp(t_local / T_stage, 0.0, 1.0);

    // 8) Effective angle with (optional) wiggle
    float angle_eff_deg = Angle_deg;
    if (Wiggle_Angle) {
        float wig = sin(3.14159265 * (2.0 * p - 1.0)); // [-1..1], 0 at edges, ±1 at center
        angle_eff_deg += Wiggle_Amount_deg * wig;
    }

    // 9) Rotated UVs with effective angle
    float a = radians(angle_eff_deg);
    vec2  ruv = rotate_uv(UV, vec2(0.5), angle_eff_deg);

    // 10) Rotated sprite horizontal footprint (in rotated space along ruv.x)
    float c = abs(cos(a));
    float s = abs(sin(a));
    float min_x = 0.5 - 0.5 * (c + s);
    float max_x = 0.5 + 0.5 * (c + s);

    // 11) Per-stage width & direction
    float width = Stage1_Width;
    bool  dir_now = Stage1_LeftToRight;
    if (stage == 2) { width = Stage2_Width; dir_now = Stage2_LeftToRight; }
    else if (stage == 3) { width = Stage3_Width; dir_now = Stage3_LeftToRight; }

    float half_w = max(width * 0.5, 1e-4);

    // Feather (hard edges if Band_Soft == 0.0)
    float soft_raw = Band_Soft;
    float soft     = max(Band_Soft, 1e-5); // avoid zero in smoothstep edges

    // Padding ensures the band starts & ends fully off the sprite for this stage
    float pad = half_w + soft;

    // Offscreen→offscreen sweep bounds for this stage
    float start_x = min_x - pad;
    float end_x   = max_x + pad;

    // 12) Sweep center position (off→off)
    float center = dir_now ? mix(start_x, end_x, p) : mix(end_x, start_x, p);

    // 13) Distance from band center → mask
    float d = abs(ruv.x - center);

    float band;
    if (soft_raw <= 0.0) {
        band = step(d, half_w);   // crisp hard edge
    } else {
        band = 1.0 - smoothstep(half_w, half_w + soft, d);
    }

    // Apply only where the sprite is visible
    band *= base.a;

    // 14) Add white shine and premultiply for premul-alpha blending
    vec3 lit_rgb = base.rgb + vec3(1.0) * (band * Brightness);
    float out_a   = base.a;
    vec3  out_rgb = lit_rgb * out_a;

    COLOR = vec4(out_rgb, out_a);
}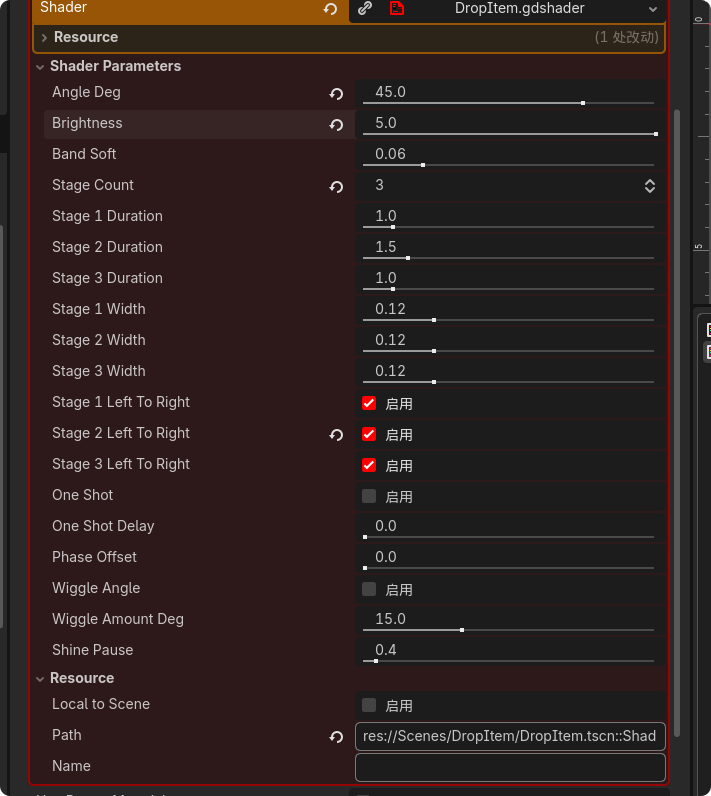
然后可以识别到shader暴露出来可以给你调整的一些参数,这些参数我们也可以通过动画调节,但是其实现在的shader不用我们的脚本控制已经是我想要的效果了!物品在地面上有shine的高亮效果!
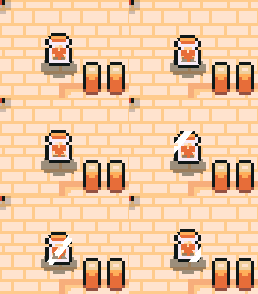
也可以用脚本改一改参数玩一玩,比如动态的修改那个shine的角度
extends Area2D


@export var shine_angle: int = 45


@onready var drop_icon: Sprite2D = $DropIcon


func _process(delta: float) -> void:
	var shine_tween = create_tween()
	shine_tween.tween_property(drop_icon.material,"shader_parameter/Angle_deg",shine_angle,1)
大概就是这样,但是这不是重点
然后我们的背包管理也是通过全局脚本管理,为什么这样我还不知道?
Autoload/InventoryManager.gd
extends Node

var inventory: Array[SlotData];


## 30个背包槽位
const INVENTORY_SIZE = 30;

func _ready() -> void:
	# 全局初始化背包格子
	inventory.clear()
	inventory.resize(INVENTORY_SIZE)
inventory 背包的格子用数组数据结构存储,每个元素都是SlotData
INVENTORY_SIZE 固定30个背包的槽位
工具函数:
get_empty_slot_indexes() -> Array[int] 查询当前空的槽位
## get_empty_slot_indexes 获取没有存东西的背包索引值
func get_empty_slot_indexes() -> Array[int]:
	var empty_slot_indexs:Array[int] = []
	for i in inventory.size():
		if inventory[i] == null:
			empty_slot_indexs.append(i)
	return empty_slot_indexs
find_item_indexes(item: ItemData, with_space_only: bool = false) -> Array[int]
查看指定ItemData道具存在的索引值集合
如果with_space_only 为 true,函数只会返回有剩余容量能存放同类道具的位置索引
## find_item_indexes 查找存在同款Item类型的物品的索引值
## with_space_only 为true,则只把同类型没塞满格子的返回来

func find_item_indexes(item: ItemData, with_space_only: bool = false) -> Array[int]:
	var found:Array[int] = []
	if item == null or item.Icon == null:
		return found
	for i in inventory.size():
		var slot = inventory[i]
		if slot and slot.item_data == item:
			if with_space_only:
				if slot.quantity < item.MaxStack:
					found.append(i)
			else:
				found.append(i)
	return found
addItem(item: ItemData, amount: int = 1) -> void添加道具的逻辑
func addItem(item: ItemData, amount: int = 1) -> void:
	if not item or amount == 0:
		return
	var remain: int = amount

	if item.MaxStack > 1:

		# 这个逻辑只在背包之前已经存过相同类型的物品的时候才会执行 比如之前第一个槽位存过 槽位总共是64个,已经存了50个需要存10个,remain 为10
		# find_item_indexes(item, true) 返回 【0】 这样
		for index in find_item_indexes(item, true):
			if remain <= 0:
				break
			# 遍历相同类型的且有剩余空位的slot
			var slot: SlotData = inventory[index]

			# space是看看还能存多少 64 - 50 = 14
			var space = item.MaxStack - slot.quantity
			# to_give 是看看当前的槽位实际需要存多少,remain 为10,space为14 实际就存了10个
			# 但是 remain(amount) 如果为24个,space为14,那实际就存了14个,所以就取最小
			var to_give = min(space, remain)

			# 更新当前slot的存储数量值
			slot.quantity += to_give

			# 假如按照一开始要存24 , 我们只在已经存在的slot存了14个,那么就还有 24 - 14 10个需要存,remain 变为10了
			remain -= to_give

	# 这个分支需要找完全空的格子了
	if remain > 0:
		#  get_empty_slot_indexes() 【1,2,3,~ n】
		for index in get_empty_slot_indexes():
			if remain <= 0:
				break

			# 比如上面剩余10个,但就实际存 10 个 如果还有100个,那就是只存最多存的64 依旧取最小即可
			var to_give = min(remain,item.MaxStack)

			# 实例化新的slot实例到背包,初始化类型和存的数量
			inventory[index] = SlotData.new(item, to_give)

			# 加入之前那一步 100 存 64 还剩36 remain 就是 100-64 = 36,可以再次进入循环处理,再去找新的空白格来处理剩下的36个
			remain -= to_give
	# 初始remain 是 和 amount相等的,如果remain变少说明背包有存了东西,背包发生了变化,这里我们用信号来通知
	var added: int = amount - remain
	if added > 0:
		on_inventory_change.emit()
InventoryPannel 场景脚本做全局背包变化的监听
extends HBoxContainer
class_name InventoryPannel

@onready var grid_container: GridContainer = %GridContainer

var slots: Array[InventorySlot] = []


func _ready() -> void:

	# 初始化
	InventoryManager.on_inventory_change.connect(_on_inventory_change)

	# 根据自身的背包数量初始化自己的存储节点,
	# 其实我觉得这里可以让 InventoryManager 提供一个初始化函数,根据 grid_container 的子节点的InventorySlot来初始化,
	# 因为现在 InventoryManager 是写死的
	for index in grid_container.get_child_count():
		# 循环遍历初始化下面的 InventorySlot 并且绑定各种信号
		var slot = grid_container.get_child(index) as InventorySlot
		slot.slot_index = index
		slot.on_slot_clicked.connect(_on_slot_clicked)
		slot.on_slot_hovered.connect(_on_slot_hovered)
		slots.append(slot)


func _on_slot_clicked(index: int):
	print(index)

func _on_slot_hovered(index: int):
	print(index)

func _on_inventory_change() -> void:
	for i in slots.size():
		var slot: SlotData = InventoryManager.inventory[i]
		slots[i].load_slot(slot)