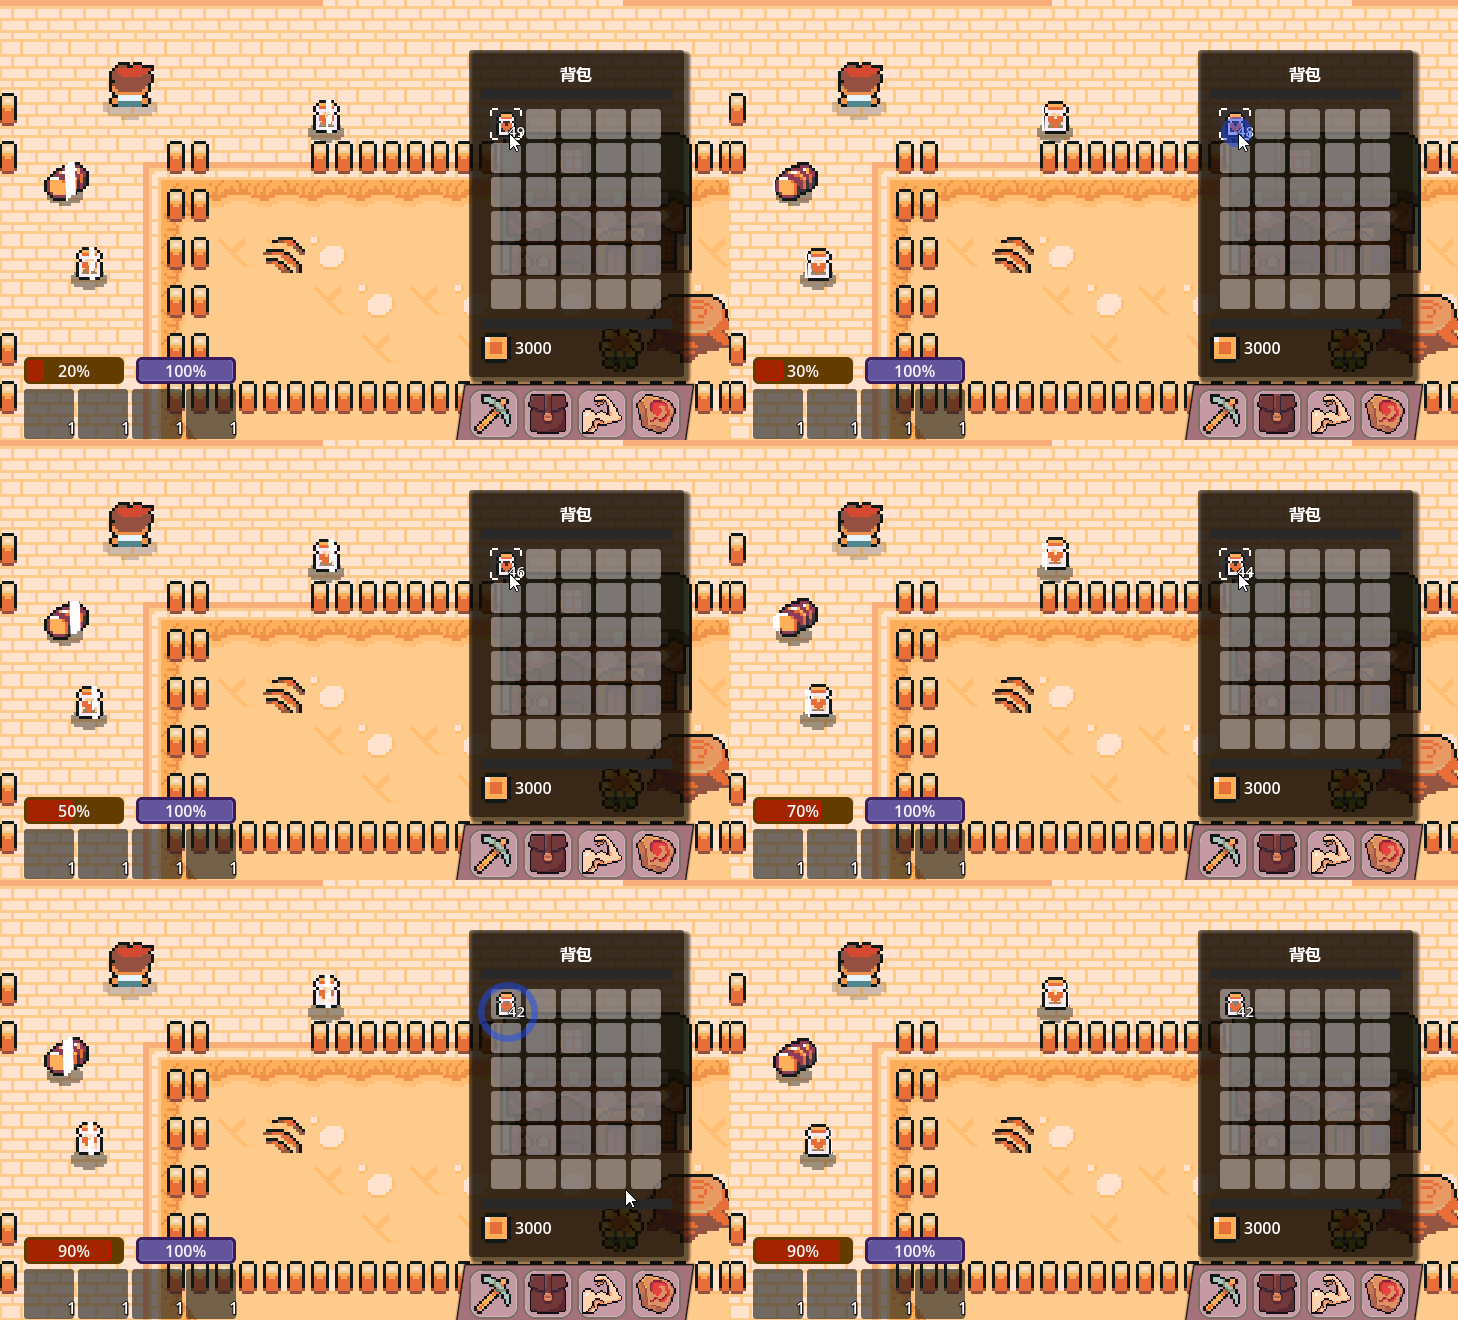
添加物品到背包
首先整理下场景
Town是主要的游戏场景
HUD/InventoryPannel
InventoryPannel 就是整体的背包面板场景
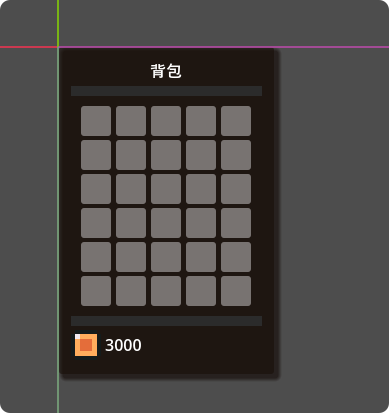
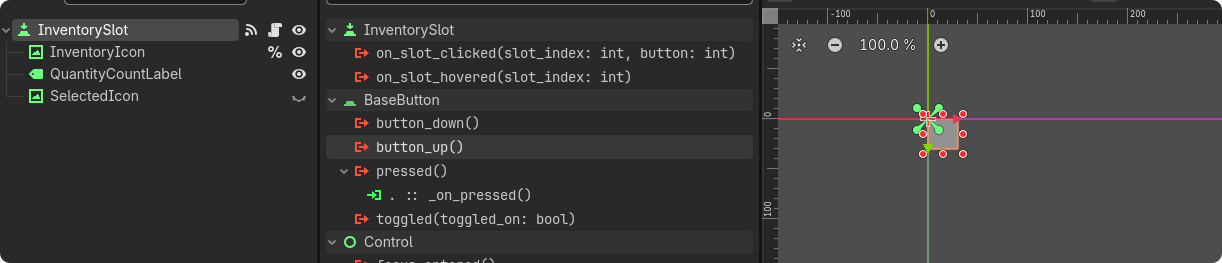
里面每个格子都是一个Button,我们把每个格子都单独的当一个场景 InventorySlot
包括需要渲染的图标
展示的物品数量
选择的状态Icon
全局的背包管理 InventoryManger
背包的管理在Godot用一个全局脚本总线来做,方便跨多节点的通信
统一存放背包所有操作信号,所有 UI、玩家、拾取物、商店、NPC 只和总线收发消息,互不直接引用,彻底解耦。
后期可能有怪物掉落道具,NPC奖励道具各种其他复杂的场景,如果挂载到 InventoryPannel 节点去管理,每个都要在各种情况去和 InventoryPannel 进行交互,很难以维护
这种设计的好处就是 InventoryManger 负责信号管理就控制好背包数据,其他节点只负责根据不同的场景收发信号
再来整理下数据流
Item ItemData
extends Resource
class_name Item

## 物品Icon
@export var Icon: Texture2D;

## 物品名称
@export var ItemName: String;

## 物品描述
@export_multiline var Desc:String;

## 物品价格
@export var Price: int;
extends Item
## ItemData(通用道具父类):背包可存放道具,分类 Type、堆叠、消耗标记
class_name ItemData
enum Type {
FOOD,
POTION,
SCROLL,
EQUIPMENT
}
## 物品类型 FOOD(食物) POTION(药水) SCROLL(卷轴)EQUIPMENT(装备)
@export var ItemType: Type;
## 是否可以被消耗:比如药水
@export var IsConsumable:bool;
## 物品堆叠上线
@export var MaxStack: int = 64;背包格子存储 ItemData 物品类型,quantity 物品数量 整合成新的 Recource -> SlotData
extends Resource
class_name SlotData;

@export var item_data: ItemData;

@export var quantity: int;

func _init(_item:ItemData, _quantity: int) -> void:
	item_data = _item
	quantity = _quantity
InventoryManger 直接管理的也是 SlotData 的数组
这个脚本和UI的背包格子保持数量一致(后期看看可以根据这个脚本在UI里面动态创建,分页)
extends Node

var inventory: Array[SlotData];

signal on_inventory_change
## 30个背包槽位
const INVENTORY_SIZE = 30;

func _ready() -> void:
	# 全局初始化背包格子
	inventory.clear()
	inventory.resize(INVENTORY_SIZE)
	print(get_empty_slot_indexes())

## get_empty_slot_indexes 获取没有存东西的背包索引值
func get_empty_slot_indexes() -> Array[int]:
	var empty_slot_indexs:Array[int] = []
	for i in inventory.size():
		if inventory[i] == null:
			empty_slot_indexs.append(i)
	return empty_slot_indexs


## find_item_indexes 查找存在同款Item类型的物品的索引值
## with_space_only 为true,则只把同类型没塞满格子的索引值返回来
func find_item_indexes(item: ItemData, with_space_only: bool = false) -> Array[int]:
	var found:Array[int] = []
	if item == null or item.Icon == null:
		return found
	for i in inventory.size():
		var slot = inventory[i]
		if slot and slot.item_data == item:
			if with_space_only:
				if slot.quantity < item.MaxStack:
					found.append(i)
			else:
				found.append(i)
	return found


func _input(event: InputEvent) -> void:
	if Input.is_action_just_pressed("ui_accept"):
		addItem(preload("uid://5bk25n7jt3ss"),124)

func addItem(item: ItemData, amount: int = 1) -> void:
	if not item or amount == 0:
		return
	var remain: int = amount

	if item.MaxStack > 1:

		# 这个逻辑只在背包之前已经存过相同类型的物品的时候才会执行 比如之前第一个槽位存过 槽位总共是64个,已经存了50个需要存10个,remain 为10
		# find_item_indexes(item, true) 返回 【0】 这样
		for index in find_item_indexes(item, true):
			if remain <= 0:
				break
			# 遍历相同类型的且有剩余空位的slot
			var slot: SlotData = inventory[index]

			# space是看看还能存多少 64 - 50 = 14
			var space = item.MaxStack - slot.quantity
			# to_give 是看看当前的槽位实际需要存多少,remain 为10,space为14 实际就存了10个
			# 但是 remain(amount) 如果为24个,space为14,那实际就存了14个,所以就取最小
			var to_give = min(space, remain)

			# 更新当前slot的存储数量值
			slot.quantity += to_give

			# 假如按照一开始要存24 , 我们只在已经存在的slot存了14个,那么就还有 24 - 14 10个需要存,remain 变为10了
			remain -= to_give

	# 这个分支需要找完全空的格子了
	if remain > 0:
		#  get_empty_slot_indexes() 【1,2,3,~ n】
		for index in get_empty_slot_indexes():
			if remain <= 0:
				break

			# 比如上面剩余10个,但就实际存 10 个 如果还有100个,那就是只存最多存的64 依旧取最小即可
			var to_give = min(remain,item.MaxStack)
			# 实例化新的slot实例到背包,初始化类型和存的数量
			inventory[index] = SlotData.new(item, to_give)

			# 加入之前那一步 100 存 64 还剩36 remain 就是 100-64 = 36,可以再次进入循环处理,再去找新的空白格来处理剩下的36个
			remain -= to_give
	# 初始remain 是 和 amount相等的,如果remain变少说明背包有存了东西,背包发生了变化,这里我们用信号来通知
	var added: int = amount - remain
	if added > 0:
		on_inventory_change.emit()
其实这个脚本只负责自己内部维护好背包的数据,然后发生改变的时候就发射一个信号出去
然后InventoryPannle的脚本就去接受这个信号,根据 InventoryManger 的数据去实时更新UI背包
extends HBoxContainer
class_name InventoryPannel

@onready var grid_container: GridContainer = %GridContainer

var slots: Array[InventorySlot] = []


func _ready() -> void:

	# 初始化
	InventoryManager.on_inventory_change.connect(_on_inventory_change)

	# 根据自身的背包数量初始化自己的存储节点,
	# 其实我觉得这里可以让 InventoryManager 提供一个初始化函数,根据 grid_container 的子节点的InventorySlot来初始化,
	# 因为现在 InventoryManager 是写死的
	for index in grid_container.get_child_count():
		# 循环遍历初始化下面的 InventorySlot 并且绑定各种信号
		var slot = grid_container.get_child(index) as InventorySlot
		slot.slot_index = index
		slot.on_slot_clicked.connect(_on_slot_clicked)
		slot.on_slot_hovered.connect(_on_slot_hovered)
		slots.append(slot)

func _on_slot_clicked(index: int):
	print(index)

func _on_slot_hovered(index: int):
	print(index)

func _on_inventory_change() -> void:
	for i in slots.size():
		var slot: SlotData = InventoryManager.inventory[i]
		slots[i].load_slot(slot)
别看那么多代码,其实目前阶段有用的就,其他都是绑定 InventorySlot 内部按钮的 click hover的信号绑定的
func _on_inventory_change() -> void:
	for i in slots.size():
		var slot: SlotData = InventoryManager.inventory[i]
		slots[i].load_slot(slot)
这里面监听 InventoryManager维护的数据变化,然后每个 InventorySlot 内部根据数据做数据渲染的逻辑
extends Button
class_name InventorySlot;


## slot_index 被点击的格子索引值, button 1 / 0 鼠标左右键,不同的点击方式功能不一样
signal on_slot_clicked(slot_index: int,button: int)

## 格子鼠标悬浮过触发
signal on_slot_hovered(slot_index: int)

@onready var inventory_icon: TextureRect = %InventoryIcon
@onready var quantity_count_label: Label = $QuantityCountLabel
@onready var selected_icon: TextureRect = $SelectedIcon

## slot_index 这个slot_index 会在背包动态根据格子的位置动态更新, -1 为初始值且是无效值,这个格子不给去执行交互
var slot_index: int  = -1

## 当前格子会承载的物品数据
var slot_data: SlotData;

# load_slot 绑定当前格子的物品信息,这个目前在哪里执行还不知道,应该是触发更新才执行
# pannel 中当背包数据全局变化,循环所有的背包格子节点执行更新调用的
func load_slot(_slot_data: SlotData):
	slot_data = _slot_data
	if slot_data and slot_data.item_data:
		## 更新icon
		inventory_icon.texture = slot_data.item_data.Icon
		inventory_icon.show() # 坑clear_slot() 会隐藏图标,但 load_slot() 在重新放入物品时没有把图标显示回来。
		## 如果load的数量大于1才展示格子的数量label,否则不展示那个数量下标
		if slot_data.quantity > 1:
			quantity_count_label.text =  str(slot_data.quantity)
			quantity_count_label.show()
		else:
			quantity_count_label.hide()
	else:
		clear_slot()

## clear_slot 清理格子
func clear_slot() -> void:
	slot_data = null
	inventory_icon.texture = null
	inventory_icon.hide()
	quantity_count_label.hide()


func _on_pressed() -> void:
	on_slot_clicked.emit(slot_index) # Replace with function body.


func _on_mouse_entered() -> void:
	selected_icon.show()
	on_slot_hovered.emit(slot_index) # Replace with function body.


func _on_mouse_exited() -> void:
	selected_icon.hide() # Replace with function body.
内部拿到 SlotData 数据,取出ItemData,和 数量 quantity 渲染Icon 渲染数量
阶段总结:全局InventoryManger 维护背包数据,Pannel UI 类似于整个背包组件的父组件,SlotUI就是每个格子的子组件Pannel UI 监听到全局背包数据的变化就通知每个SlotUI背包格子组件根据最新数据更新自己这样如果其他的地方,比如和NPC亲密度到了某个值派发了奖励物品,也只需要和全局脚本更新数据,然后发送change即可,不用每个地方都直接和背包组件做交互了
物品格子之间的交换和合并
先看思路:其实这两个方法也是全局维护背包数据的方法啦
如果两个物品不是同个类型的就执行交换
如果两个物品是同个类型的就执行合并
首先是实现物品的选中效果
就是我想把某个物品移动到其他的格子或者是和其他格子的物品做交换和合并的操作!
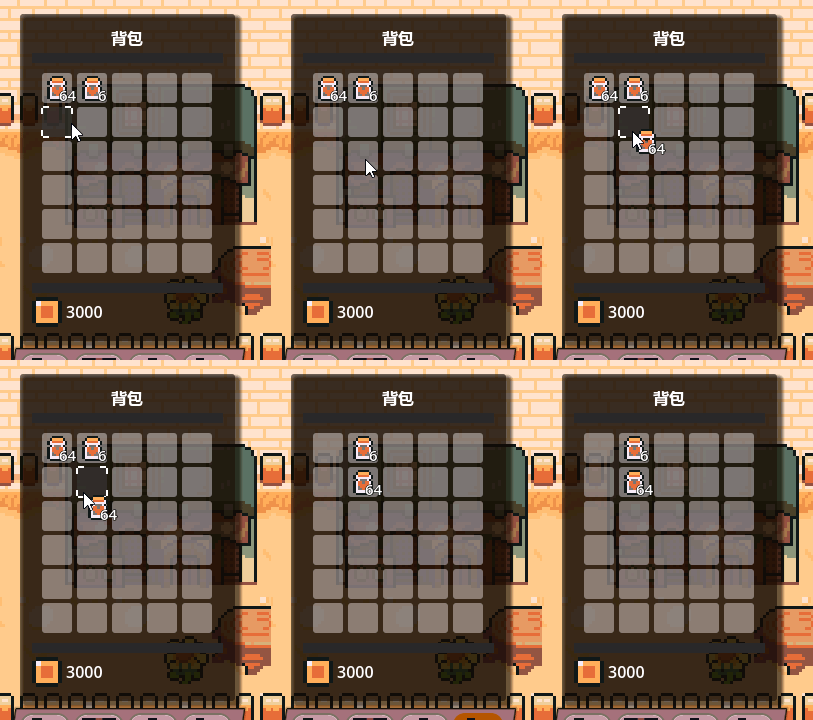
就是点击一下格子的物品,这个物品跟随我鼠标去移动,然后点击某个格子和其发生交互,这个物品的选中效果的实现思路
这里其实就在场景中单独创建一个InventorySlot 命名为 GrabbedSlot 专门渲染选中的物品数据,并且跟随鼠标的全局坐标移动,本质上也是渲染SlotData数据 ,开启Flat 平面按钮不显示任何装饰!(背景色那些,只显示 Icon 和数量)
物品交换数据流
背包 Pannel 监听每个按钮的回调,左键点击了哪个按钮
监听点击事件,记录点击的值,如果点击的背包格子是有物品的,则显示 GrabbedSlot ,并且load_slot的数据
然后如果下次再次触发点击,不一致,则判断之前选中的格子是否有物品,如果有物品则表示正在拖入其他的物品到这个格子
判断物品类型是否一致,如果不一致则执行交换,如果一致则执行合并
# 左键点击
func handle_left_button(slot_index: int):
	# 如果有记录的选中的格子,并且下次点击的格子和当前格子的索引不一致,则可能是有正在拖动的物品(也可能没有,这个放在这部分逻辑里面去判断)
	if selected_slot_index >= 0 and selected_slot_index != slot_index:
		var fromItemData = InventoryManager.get_slot_item(selected_slot_index)
		var toItemData = InventoryManager.get_slot_item(slot_index)

		# 如果都有而且类型不相同就执行交换
		if fromItemData and fromItemData != toItemData:
			InventoryManager.swrap_slot(selected_slot_index,slot_index)
		# 否则就执行合并
		else:
			InventoryManager.merge_slot(selected_slot_index,slot_index)
		deselected_slot()
	else:
		select_slot(slot_index)

func select_slot(index: int)-> void:
	deselected_slot() # 选择了新的格子的话,清空一下之前的选择数据
	selected_slot_index = index # 记录选择的格子索引
	var slot = InventoryManager.get_slot(index)
	grabbed_slot.load_slot(slot)
	grabbed_slot.show()

func deselected_slot() -> void:
	selected_slot_index = -1
	grabbed_slot.hide()

func _process(delta: float) -> void:
	# 实时更新 grabbedSlot 的全局坐标跟随鼠标的移动坐标值
	if grabbed_slot.visible:
		grabbed_slot.global_position = get_global_mouse_position()
InventoryManger的 交换和合并逻辑!
#region 移动合并背包物品
## swrap_slot 交换格子
func swrap_slot(from_slot_index: int, to_slot_index: int)->void:
	if from_slot_index < 0 or from_slot_index >= INVENTORY_SIZE:
		return
	if to_slot_index < 0 or to_slot_index >= INVENTORY_SIZE:
		return

	# 存储目标格子的临时SlotData
	var tmp = get_slot(to_slot_index)

	# 把目标格子的数据存为from的
	inventory[to_slot_index] = inventory[from_slot_index]

	# from 存储缓存的临时to的数据
	inventory[from_slot_index] = tmp

	# 发射信号
	on_inventory_change.emit()

# merge_slot 合并格子,相同类型的物品才能合并
func merge_slot(from_slot_index: int, to_slot_index: int)->void:
	var from_slot:SlotData = get_slot(from_slot_index)
	var to_slot:SlotData = get_slot(to_slot_index)
	if not from_slot or not to_slot:
		return
	if from_slot.item_data != to_slot.item_data:
		return

	var from_item: ItemData = from_slot.item_data
	if from_item.MaxStack <= 1:
		# 某种类型的物品不允许堆叠,比如装备
		return

	# 可以存放的空间值
	var space = from_item.MaxStack - to_slot.quantity

	# 如果空间值小于等于0,那就直接交换即可
	if space <= 0:
		swrap_slot(from_slot_index,to_slot_index)
		return
   # 可存的空间值和要存的值 取最小,比如要存30 空间只有20了 那就只能存20了 to_give = 20
	var to_give = min(space,from_slot.quantity)

   # 原来的格子的数量就 -20 剩下10个
	from_slot.quantity -= to_give

   # 目标的格子就增加 20
	to_slot.quantity += to_give

   # 如果原来格子的合并的没有了 目标格子可以存下全部的from,那就from的格子就置为空格子
	if from_slot.quantity <=0:
		inventory[from_slot_index] = null
	on_inventory_change.emit()
 #endregion
使用背包的物品-生命值物品举例
res://Autoload/InventoryManager.gd 里面的方法
canUseItem 判断某个格子的物品是否可以使用(没有物品,物品数量小于等于0 物品不是可以消耗的类型)
useItem 消耗物品 也是一系列判断,然后减库存,减库存到没有就清空背包格子数据,触发更新信号
#region 使用物品
func canUseItem(slot_index: int) -> bool:
	var slotData = inventory[slot_index]
	if not slotData: return false
	if slotData.quantity <= 0: return false
	if not slotData.item_data.IsConsumable: false
	return true

func useItem(slot_index: int) -> void:
	var slotData = inventory[slot_index]
	if not slotData: return
	if not slotData.item_data.IsConsumable: return
	slotData.quantity -= 1
	if slotData.quantity <= 0:
		inventory[slot_index] = null
	on_inventory_change.emit()
#endregion
操作行为,右键使用物品,如果可以使用就调用 InventoryManger的使用,并且全局触发一个Bus事件,使用了某个物品,方便其他场景节点更新某些数据
比如喝了一瓶HP药水增加玩家生命值 背包绑定在Town场景的UI,而生命值是挂在在Player的Health Components组件场景的,直接进行组件通信耦合程度太高了
所以就通过EventBus去通信了
extends Node


# on_player_health_updated health_updated的时候
signal on_player_health_updated(current:float,max:float)

signal on_inventory_use_item_data(itemData: ItemData)
然后目前Player是在Town主场景动态创建的
HealthComponent 的Heal方法,治疗value点生命值,最大生命值max_heath
func heal(value: float)-> void:
	current_health += value
	current_health = min(current_health , max_health)
	EventBus.on_player_health_updated.emit(current_health, max_health)
这个方法会在使用物品的信号触发回调
extends Node2D

@export var player_scene:PackedScene;

@onready var health_bar: ProgressBar = %HealthBar
@onready var mana_bar: ProgressBar = %ManaBar
var player:Player

func _ready() -> void:
	create_player()
	EventBus.on_player_health_updated.connect(_on_player_health_updated)

	# 主场景绑定使用物品
	EventBus.on_inventory_use_item_data.connect(_on_inventory_use_item_data)

# 创建玩家player
func create_player() -> void:
	if player_scene and player_scene.can_instantiate():
		player = player_scene.instantiate()
		add_child(player)
		player.setup();
		# 用脚本来存全局的player后面其他地方可能会需要
		#Refs.player = player

func _on_player_health_updated(current_health:float, max_health:float) -> void:
	health_bar.value = current_health/max_health

# 这里其实还会进行物品类型判断,但是目前就只展示HP药水,所以只调用heal即可
func _on_inventory_use_item_data(item: ItemData) -> void:
	if not item:
		return
	player.health_component.heal(item.value)